Learn how to clean a carburetor on your lawn mower with this guide. Prevent common issues and enhance mower performance.

Image credit: Stadtbetrieb/Pixabay
There are two ways of going about cleaning the carburetor:
- Removing the carburetor and cleaning it
- Cleaning the carburetor without removing it
Method 1 – Removing and Cleaning the Carburetor

Tools and Equipment Needed
- Flathead screwdriver
- Socket wrench set
- Carburetor cleaner canister
- Old toothbrush or wire brush
- Gloves
- Safety Glasses
Step-by-step Guide (6)
1. Safety and Preparation
Make sure to disconnect the spark plug before anything.
Any remaining fuel in your lawn mower could potentially leak out during the process of removing and cleaning the carburetor. To prevent this, either run your lawn mower until it’s out of fuel or use a siphon pump to remove excess gasoline from your tank.
Always work in a well-ventilated area.
Put on gloves and safety glasses before starting to work with the lawn mower.
Also, take a moment to thoroughly clean the exterior of your lawn mower.
2. Removing the Carburetor
First, remove the air filter cover to gain better access. The air filter is usually fastened with a few screws.
Then, remove the air filter to. Doing this should be as simple as just gently lifting it out after you’ve removed the air filter cover.
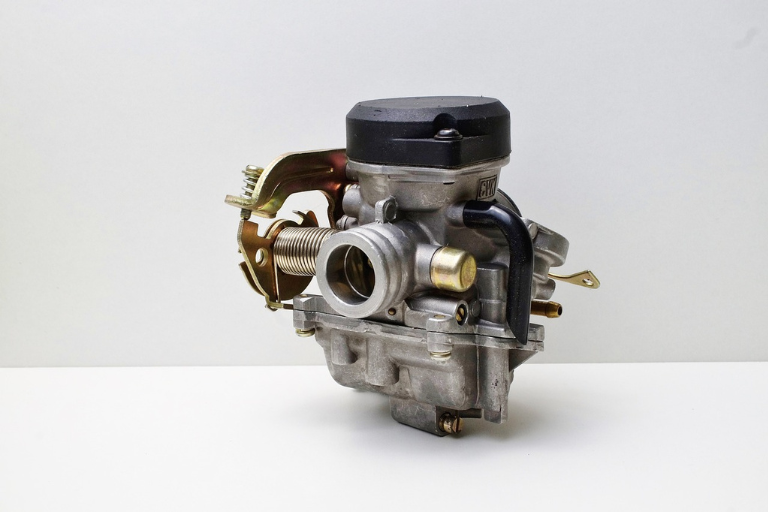
Okay, now onto freeing that carburetor from its place. Unscrew it carefully from its housing—just a few screws usually. Gently ease off any fuel lines connecting it to the rest of the machine. Use a small container or rag to catch any residual fuel that might leak out as you disconnect those lines.
3. Disassembling the Carburetor
Begin by detaching the bowl from the bottom of your carburetor. Be careful when removing this bowl as there is usually some leftover fuel inside.
Next, you’ll notice many tiny holes throughout the carburetor. These are all passages for air and fuel which are integral to its operation so they mustn’t be obstructed in any way.
With that in mind, go ahead and remove any remaining components such as floats, needles or jets.
4. Cleaning the Carburetor Parts
In a well-ventilated area, spray each part with an ample amount of carburetor cleaner and let it sit for several minutes. Following this soak period, use an old toothbrush or small paintbrush to scrub away any stubborn dirt or grime.
Don’t want to use ANY water to clean the carburetor – it could ruin your engine.
Dry all of the pieces thoroughly before reassembly.
5. Reassembling the Carburetor
Start by replacing the small parts first. They are usually the trickiest and include components such as jets and screws.
After that, move on to larger pieces like the float bowl and gaskets. They’re easier to handle and should fit snugly in place if you’ve done everything correctly up to this point.
6. Reinstalling the Carburetor
Gently place the carburetor back into its slot in the engine and secure it with the screws you initially removed.
Once all those screws are tightened up, reconnect your fuel lines to their respective posts on your lawn mower carburetor. Ensure they’re tightly fitted.
After this, reattach the spark plug wire.
Finally, pour some fuel into your lawn mower engine and prepare yourself for what should be music to your ears when you start the engine.
And that’s how to clean a carburetor on a lawn mower by removing it!
Method 2 – Clean the Carburetor Without Taking It Off

Read the full article on How to Clean a Lawn Mower Carburetor Without Removing It
Tools Needed
- Carburetor Cleaner Spray
- Soft Brush
- Compressed Air
- Durable Gloves
- Goggles
- Dust Mask (optional)
- Pliers
- Camera or Smartphone
Step-by-step Guide (12)
Now, it’s time to start cleaning and I recommend wearing durable gloves, Goggles, and a dust mask to avoid getting fuel or chemicals on your skin while working.
1. Photograph the Carburetor
Take a picture of the lawn mower before you start doing anything else. Your photographs will provide an reference for the position of any cables or linkages.
2. Disconnect the Spark Plug Wire
You’ll need to disconnect the spark plug wire. Locating this won’t be tricky. It’s typically just a conspicuous wire attached to the spark plug.
3. Remove the Air Filter Cover
The air filter cover is usually found on the side of the carburetor. Once you’ve found it, you’ve got to remove it. Some covers may be held in place with screws while others might simply clip on or off.
4. Remove the Air Filter
In most models, removing the air filter involves unscrewing or unclipping a cover and carefully extracting the filter. Remember to be gentle!
5. Use a Carburetor Cleaner Spray
At this point, you will need a carburetor cleaner spray. Aim the nozzle towards the dirty carburetor, let loose with a liberal spray into its opening. Be careful not to drench it entirely.
6. Operate the Throttle and Choke
Start by manually moving the throttle back and forth. This motion helps to work the cleaner into any stubborn spots that might still be hanging onto grime or build-up from fuel residues.
Now, don’t neglect your choke in this process either. Just like with the throttle, manually move it back and forth to ensure every nook and cranny gets a good wash.
7. Clean the Carburetor’s Throat and Jets
To tackle the carburetor’s throat, first locate it on your lawn mower. It’s typically situated right where the air filter was. Grab a can of carburetor cleaner and spray directly into this opening.
Next up are the jets – those small openings within the carburetor that allow fuel to flow through and mix with air for combustion. Directly apply generous amounts of carburetor cleaner into these tiny holes as well.
Keep rags at hand for any spillage or overspray from the cleaning process.
8. Blow Out the Carburetor with Compressed Air
There may still be stubborn particles clinging onto corners and crevices. Blowing out the carburetor with compressed air ensures that every part gets a thorough clean.
9. Reinstall the Air Filter
If you decided to wash the air filter, make sure it’s completely dried before reinstallation. If you found it torn or excessively dirty beyond repair then replacing it with a new one would be wiser.
10. Reattach the Air Filter Cover
Take that cover and give it one quick check-over before putting it back on your machine. If there’s any build-up or debris clinging on to this part too, feel free to give it a good wash. Go ahead and reattach that protector back into place when you think it’s clean enough.
11. Reconnect the Spark Plug Wire
Carefully align the spark plug wire’s end with the tip of the spark plug. Push down until you feel a small click. This ensures that a secure connection has been made.
Never touch the metallic part while reattaching it especially if your hands are wet.
12. Test the Lawn Mower
Turn on your now spotless engine. Listen carefully for any sporadic rhythms or grating sounds that may suggest trouble under the hood. If everything is running well – congratulations! You’ve succeeded.
However, if something doesn’t sound quite right it may simply need more thorough washing or maybe even professional help.
And that’s how to clean a carburetor on a lawn mower without taking it off!
Common Issues With the Carburetor
Here are some common issues lawn mower owners face regarding the carburetor:
Running issues
If your lawn mower is starting up but then quickly dying off or running unevenly, there’s a good chance you’ve got some debris gumming up the works in the carburetor.
Fuel delivery problems
Another common issue is when fuel fails to reach the carburetor altogether. This could very well be due to a blocked fuel line or a faulty fuel filter. Always make sure these are clean and clear when routinely servicing your lawn mower engine.
Spark plug issues
On occasion, if the spark plug isn’t working properly, this can also lead to poor performance of your lawn mower. It’s good practice to regularly check and clean spark plugs as part of your maintenance routine.
Maintenance Tips for a Clean Carburetor
To keep your carburetor spick and span between major cleanings, there are a few tips you can adopt.
Use fresh fuel
First off, always use fresh fuel. Old fuel tends to separate and clog up the small jets and passages within the carburetor with gunk. This leads to performance issues for your lawn mower engine.
Use a fuel stabilizer
Next in line is using a fuel stabilizer. This can make a significant difference as it prevents the fuel from breaking down and depositing sediments in your lawn mower carburetor over time. It’s a good idea to add a stabilizer whenever you fill up your gas can at the station.
Running dry before storage
If you’re not going to use your lawnmower for a while – say, over winter – run it until it uses up all its fuel. Otherwise, this fuel might end up varnishing the inside of your carburetor if left alone for an extended period.
Regular checks
Regularly checking on things like air filters and spark plugs can do wonders for you. Keeping these clean will help you avoid larger issues down the line that would require opening up or even replacing the entire carburetor.
Further Reading on Lawn Mower Carburetors
How Does a Lawn Mower Carburetor Get Dirty?
A dirty lawn mower carburetor can lead to a host of problems, from poor engine performance to complete breakdowns. But how does a lawn mower carburetor get dirty in the first place? Dirt and debris can enter the carburetor through the air intake, mixing with fuel and causing blockages. Additionally, old fuel can leave varnish and residue that accumulate over time. Understanding these factors is key to preventing carburetor issues and maintaining your mower’s performance.
How to Clean a Lawn Mower Carburetor Without Removing It
Maintaining your lawn mower carburetor is essential for ensuring smooth operation, but did you know you can clean a lawn mower carburetor without removing it? This process involves using a carburetor cleaner spray to dissolve and remove the grime and deposits that hinder performance. By following simple steps, you can avoid the hassle of disassembly and keep your mower running efficiently.
Unclog a Lawn Mower Carburetor with These Simple Steps
Clogged carburetors are a common issue that can severely affect your mower’s performance. Fortunately, unclogging a lawn mower carburetor can be straightforward if you follow the right steps. From identifying the signs of clogging to using the correct tools and techniques, you can restore your mower’s efficiency and get back to maintaining your lawn with ease.
FAQ
Why does my lawn mower carburetor need cleaning?
Over time, dirt, debris, and old fuel can clog the carburetor, causing poor engine performance or preventing the engine from starting altogether. Regular cleaning ensures your lawn mower runs smoothly.
How often should I clean my lawn mower’s carburetor?
It’s recommended to clean the carburetor at least once a year, especially before the mowing season starts. If you notice performance issues, such as difficulty starting or uneven running, it might need more frequent cleaning.
Can I use household items to clean my carburetor?
While carburetor cleaner is specifically designed for this purpose, you can use alternatives like vinegar or lemon juice for a more natural approach. However, these may not be as effective as commercial carburetor cleaners.
What should I do if my lawn mower still doesn’t run well after cleaning the carburetor?
If the problem persists, it might be due to other issues like a faulty spark plug, old fuel, or problems with the fuel line. Consider consulting a professional for a more thorough inspection.
Where can I buy replacement parts for my carburetor?
Replacement parts can be purchased at lawn mower repair shops, hardware stores, or online. Ensure you have the model number of your lawn mower handy to find the correct parts.
<< Previous Post


